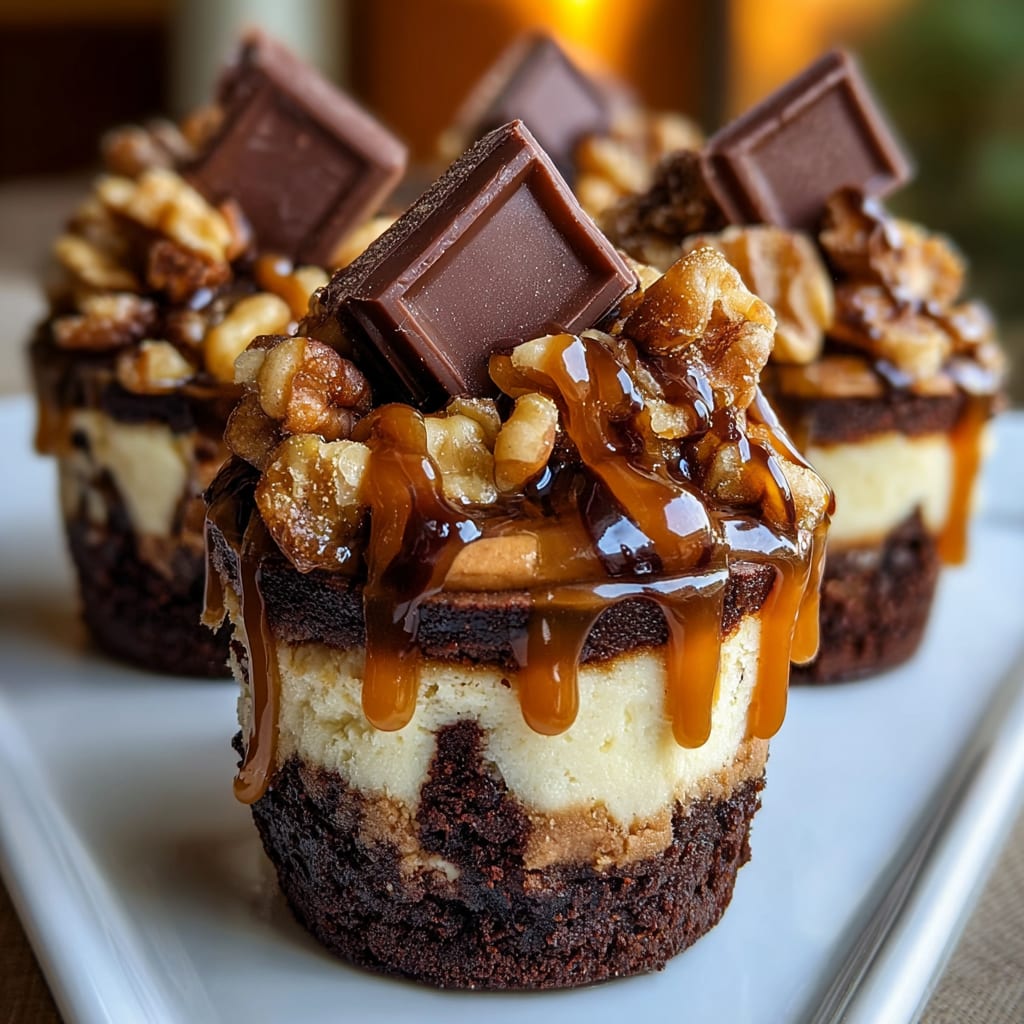
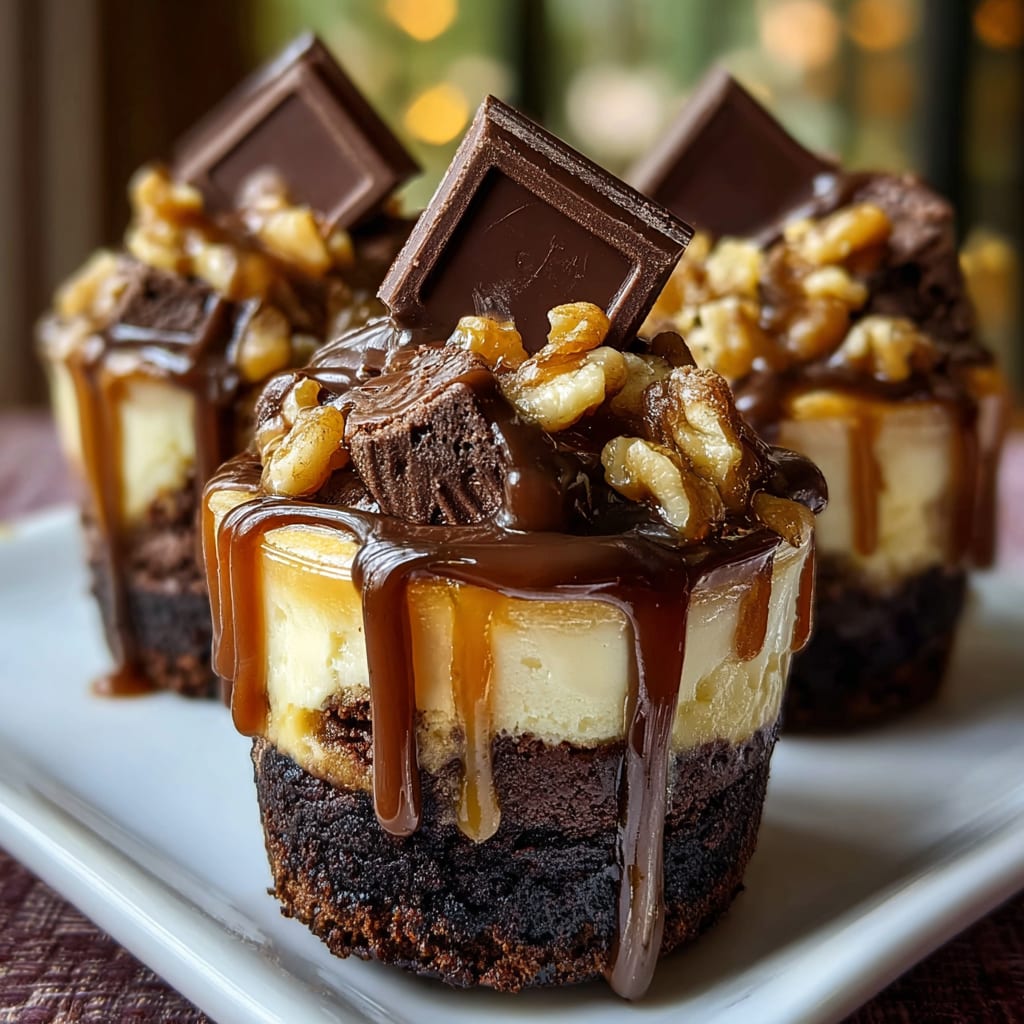
Imagine sinking your teeth into a decadent dessert that combines the fudgy richness of brownies with the creamy luxury of cheesecake, all in one perfect, portable package. These Loaded Brownie Cheesecake Cups deliver an irresistible contrast of textures and flavors that will satisfy even the most demanding sweet tooth. The chocolatey brownie base creates the perfect foundation for the velvety cheesecake layer, while customizable toppings add that extra indulgent touch. You’ll learn how to create these show-stopping treats with simple ingredients and foolproof techniques that guarantee impressive results every time.
Why You’ll Love This Recipe
These Loaded Brownie Cheesecake Cups aren’t just another dessert—they’re a revelation in texture and flavor that will quickly become your go-to treat for any occasion. The contrast between the dense, fudgy brownie bottom and the light, silky cheesecake layer creates a perfect balance that’s impossible to resist. Each bite delivers that satisfying mouthfeel where chocolatey richness meets creamy tanginess.
What makes these cups truly special is their versatility and convenience. Unlike traditional cheesecakes that require hours of baking and cooling, these individual portions come together quickly and can be customized to suit any preference. They’re perfectly portioned for controlled indulgence, eliminating the need for slicing and serving a full-sized cake.
The recipe uses simple pantry staples but delivers bakery-quality results that will impress both casual guests and discerning dessert connoisseurs. Whether you’re an experienced baker or just starting your culinary journey, these brownie cheesecake treats offer foolproof results with maximum impact.
Ingredients
For the Brownie Base:
- 1/2 cup (113g) unsalted butter, melted
- 1 cup (200g) granulated sugar
- 2 large eggs, room temperature
- 1 teaspoon vanilla extract
- 1/2 cup (42g) unsweetened cocoa powder
- 1/2 cup (63g) all-purpose flour
- 1/4 teaspoon salt
- 1/2 cup (90g) semi-sweet chocolate chips
For the Cheesecake Layer:
- 16 oz (450g) cream cheese, softened
- 2/3 cup (133g) granulated sugar
- 2 large eggs, room temperature
- 1 teaspoon vanilla extract
- 1/4 cup (60ml) sour cream
For Topping Options:
- 1/2 cup (90g) chocolate chips
- 1/4 cup (40g) chopped nuts
- 2 tablespoons caramel sauce
- 2 tablespoons chocolate sauce
- 1/4 cup (30g) crushed Oreo cookies
The cream cheese is the star of the cheesecake layer—Philadelphia brand works exceptionally well due to its consistent texture and flavor. For the brownie base, high-quality cocoa powder (like Ghirardelli or Valrhona) will elevate the chocolate intensity, creating those deep, rich flavors that make Loaded Brownie Cheesecake Cups so irresistible.
Pro Tips
Perfect Temperature Management
For the ultimate Loaded Brownie Cheesecake Cups, temperature control is crucial. Always bring refrigerated ingredients (especially eggs and cream cheese) to room temperature before mixing. Cold ingredients create lumps in your cheesecake batter and won’t incorporate properly. If you’re short on time, place cream cheese blocks in a ziplock bag and submerge in warm (not hot) water for 10-15 minutes to quickly bring them to room temperature.
The Water Bath Secret
Even though these are individual cups, a modified water bath technique will prevent cracking and ensure silky-smooth cheesecake tops. Place a large baking dish filled with about 1 inch of hot water on the rack below your cheesecake cups during baking. This creates a humid environment in the oven that prevents the cheesecake from drying out and cracking.
Two-Stage Cooling Method
For the perfect texture in your Loaded Brownie Cheesecake Cups, never rush the cooling process. After baking, turn off the oven, crack the door open, and let the cups cool inside for 30 minutes. This gradual temperature change prevents the drastic shrinking that leads to cracks. Then cool completely at room temperature before refrigerating for at least 4 hours. This patient approach guarantees that creamy, luscious texture that makes these treats so special.
Instructions
Step 1: Prepare Your Equipment
Preheat your oven to 325°F (165°C). Line a standard 12-cup muffin tin with cupcake liners, preferably parchment liners for easier removal. Lightly spray the liners with non-stick cooking spray to ensure your Loaded Brownie Cheesecake Cups release perfectly when served.
Step 2: Create the Brownie Base
In a medium bowl, whisk together the melted butter and sugar until well combined. Add eggs one at a time, whisking thoroughly after each addition. Stir in vanilla extract until incorporated. In a separate bowl, sift together cocoa powder, flour, and salt, then gradually fold this dry mixture into your wet ingredients until just combined—overmixing will make your brownies tough. Fold in chocolate chips gently, then divide the batter evenly among the prepared muffin cups, filling each about 1/3 full. Press the batter down slightly to create an even base.
Step 3: Pre-Bake the Brownie Layer
Bake the brownie bases for 10-12 minutes until they’re just set but not completely baked through. They’ll finish cooking with the cheesecake layer. Remove from the oven but leave the oven on.
Step 4: Prepare the Cheesecake Layer
While the brownie bases are pre-baking, make your cheesecake mixture. Using an electric mixer on medium-low speed, beat the softened cream cheese until completely smooth and free of lumps, about 2 minutes. Add sugar gradually and continue beating until fully incorporated and slightly fluffy. Reduce speed to low and add eggs one at a time, mixing just until combined after each addition. Be careful not to overbeat once eggs are added, as this introduces air that can cause cracks. Gently stir in vanilla extract and sour cream until smooth and velvety.
Step 5: Assemble and Bake
Carefully spoon or pour the cheesecake mixture over each partially-baked brownie base, filling each cup about 1/4 inch from the top. Tap the pan gently on the counter to release any air bubbles. Place a baking dish with 1 inch of hot water on the rack below your muffin tin to create a humid environment. Bake your Loaded Brownie Cheesecake Cups for 18-22 minutes until the edges are set but centers still have a slight jiggle.
Step 6: Cooling and Finishing
Turn off the oven, crack the door open, and let the cups cool inside for 30 minutes. Remove from the oven and cool completely at room temperature before refrigerating for at least 4 hours, preferably overnight. Once chilled, add your favorite toppings like chocolate chips, caramel drizzle, crushed cookies, or fresh berries to transform these into truly Loaded Brownie Cheesecake Cups worthy of any special occasion.
Variations
Triple Chocolate Cheesecake Cups
Transform your Loaded Brownie Cheesecake Cups into a chocolate lover’s dream by adding 1/4 cup of melted semi-sweet chocolate to the cheesecake layer. Fold it in gently after incorporating the sour cream for beautiful chocolate swirls. Top with chocolate ganache (4 oz chocolate melted with 1/4 cup heavy cream) and chocolate shavings for the ultimate triple-chocolate experience that intensifies the brownie base’s rich cocoa notes.
Peanut Butter Swirl Version
Create an irresistible salty-sweet combination by warming 1/3 cup of creamy peanut butter until pourable, then swirling it through the cheesecake layer before baking. The nutty flavor perfectly complements the chocolate brownie base, while adding mini Reese’s Pieces or chopped peanut butter cups as toppings reinforces that beloved flavor pairing in your Loaded Brownie Cheesecake Cups.
Gluten-Free Adaptation
Make these treats accessible to everyone by substituting the all-purpose flour with a high-quality cup-for-cup gluten-free flour blend in the brownie base. Add 1/4 teaspoon of xanthan gum if your blend doesn’t already contain it to maintain that perfect fudgy texture. The cheesecake layer is naturally gluten-free, making this an easy adaptation that doesn’t sacrifice any of the decadence that makes Loaded Brownie Cheesecake Cups so special.
Storage and Serving
These Loaded Brownie Cheesecake Cups maintain their perfect texture when stored properly in the refrigerator for up to 5 days. Place them in an airtight container with parchment paper between layers if stacking is necessary. For longer storage, these cups freeze beautifully for up to 3 months—wrap each individually in plastic wrap, then place in a freezer-safe container. Thaw overnight in the refrigerator for the best texture restoration.
For an elegant dessert presentation, serve your cheesecake cups on small dessert plates with a light dusting of cocoa powder and a fresh raspberry or mint sprig for color contrast. A drizzle of warm chocolate sauce just before serving adds visual appeal and enhances the decadence factor.
For a more casual serving option, create a Brownie Cheesecake Cup bar where guests can customize their own treats with various toppings like whipped cream, berry compote, crushed cookies, or chopped nuts. This interactive dessert experience is perfect for parties and makes these treats even more memorable and personalized.
FAQs
Can I make these Loaded Brownie Cheesecake Cups ahead of time?
Absolutely! These cups actually benefit from being made 1-2 days in advance as the flavors deepen and meld. Store them covered in the refrigerator and add any final toppings just before serving.
Why did my cheesecake layer crack?
Cracks usually result from overmixing (which incorporates too much air), baking at too high a temperature, or cooling too quickly. Beat ingredients just until combined, ensure your oven temperature is accurate with an oven thermometer, and always cool gradually as directed.
Can I use a boxed brownie mix for the base?
Yes! While homemade delivers the best flavor, a quality boxed mix works in a pinch. Prepare according to package directions but reduce the liquid slightly for a firmer texture that supports the cheesecake layer.
How do I know when the cheesecake cups are fully baked?
The edges should be set but the centers should still have a slight jiggle—similar to Jell-O. They’ll continue to set as they cool. Overbaking results in dry, cracked cheesecake.
Can I make these in a mini muffin tin for bite-sized treats?
Definitely! For mini Loaded Brownie Cheesecake Cups, reduce baking time by about 30-40% and watch closely. These make perfect two-bite desserts for parties and gatherings.

Loaded Brownie Cheesecake Cup
- Prep Time: 25 minutes
- Cook Time: 35 minutes
- Total Time: 1 hour
- Yield: 12 cups 1x
- Category: Dessert
- Method: Baking
- Cuisine: Americaine
Description
Loaded Brownie Cheesecake Cup with rich chocolate brownie base, creamy cheesecake filling, and decadent toppings. Indulge in this crowd-pleasing treat!
Ingredients
- 1/2 cup unsalted butter, melted
- 1 cup granulated sugar
- 2 large eggs, room temperature
- 1 teaspoon vanilla extract
- 1/2 cup unsweetened cocoa powder
- 1/2 cup all-purpose flour
- 1/4 teaspoon salt
- 1/2 cup semi-sweet chocolate chips
- 16 oz cream cheese, softened
- 2/3 cup granulated sugar
- 2 large eggs, room temperature
- 1 teaspoon vanilla extract
- 1/4 cup sour cream
- 1/2 cup chocolate chips
- 1/4 cup chopped nuts
- 2 tablespoons caramel sauce
- 2 tablespoons chocolate sauce
- 1/4 cup crushed Oreo cookies
Instructions
- Step 1: Prepare Your Equipment Preheat your oven to 325°F (165°C). Line a standard 12-cup muffin tin with cupcake liners, preferably parchment liners for easier removal. Lightly spray the liners with non-stick cooking spray to ensure your **Loaded Brownie Cheesecake Cups** release perfectly when served.
- Step 2: Create the Brownie Base In a medium bowl, whisk together the melted butter and sugar until well combined. Add eggs one at a time, whisking thoroughly after each addition. Stir in vanilla extract until incorporated. In a separate bowl, sift together cocoa powder, flour, and salt, then gradually fold this dry mixture into your wet ingredients until just combined—overmixing will make your brownies tough. Fold in chocolate chips gently, then divide the batter evenly among the prepared muffin cups, filling each about 1/3 full. Press the batter down slightly to create an even base.
- Step 3: Pre-Bake the Brownie Layer Bake the brownie bases for 10-12 minutes until they’re just set but not completely baked through. They’ll finish cooking with the cheesecake layer. Remove from the oven but leave the oven on.
- Step 4: Prepare the Cheesecake Layer While the brownie bases are pre-baking, make your cheesecake mixture. Using an electric mixer on medium-low speed, beat the softened cream cheese until completely smooth and free of lumps, about 2 minutes. Add sugar gradually and continue beating until fully incorporated and slightly fluffy. Reduce speed to low and add eggs one at a time, mixing just until combined after each addition. Be careful not to overbeat once eggs are added, as this introduces air that can cause cracks. Gently stir in vanilla extract and sour cream until smooth and velvety.
- Step 5: Assemble and Bake Carefully spoon or pour the cheesecake mixture over each partially-baked brownie base, filling each cup about 1/4 inch from the top. Tap the pan gently on the counter to release any air bubbles. Place a baking dish with 1 inch of hot water on the rack below your muffin tin to create a humid environment. Bake your **Loaded Brownie Cheesecake Cups** for 18-22 minutes until the edges are set but centers still have a slight jiggle.
- Step 6: Cooling and Finishing Turn off the oven, crack the door open, and let the cups cool inside for 30 minutes. Remove from the oven and cool completely at room temperature before refrigerating for at least 4 hours, preferably overnight. Once chilled, add your favorite toppings like chocolate chips, caramel drizzle, crushed cookies, or fresh berries to transform these into truly **Loaded Brownie Cheesecake Cups** worthy of any special occasion.
Notes
Fresh ingredients will always yield the best flavor results.
Nutrition
- Serving Size: 1 cup
- Calories: 380
- Sugar: 30g
- Sodium: 200mg
- Fat: 24g
- Saturated Fat: 14g
- Unsaturated Fat: 8g
- Trans Fat: 0g
- Carbohydrates: 37g
- Fiber: 2g
- Protein: 6g
- Cholesterol: 110mg