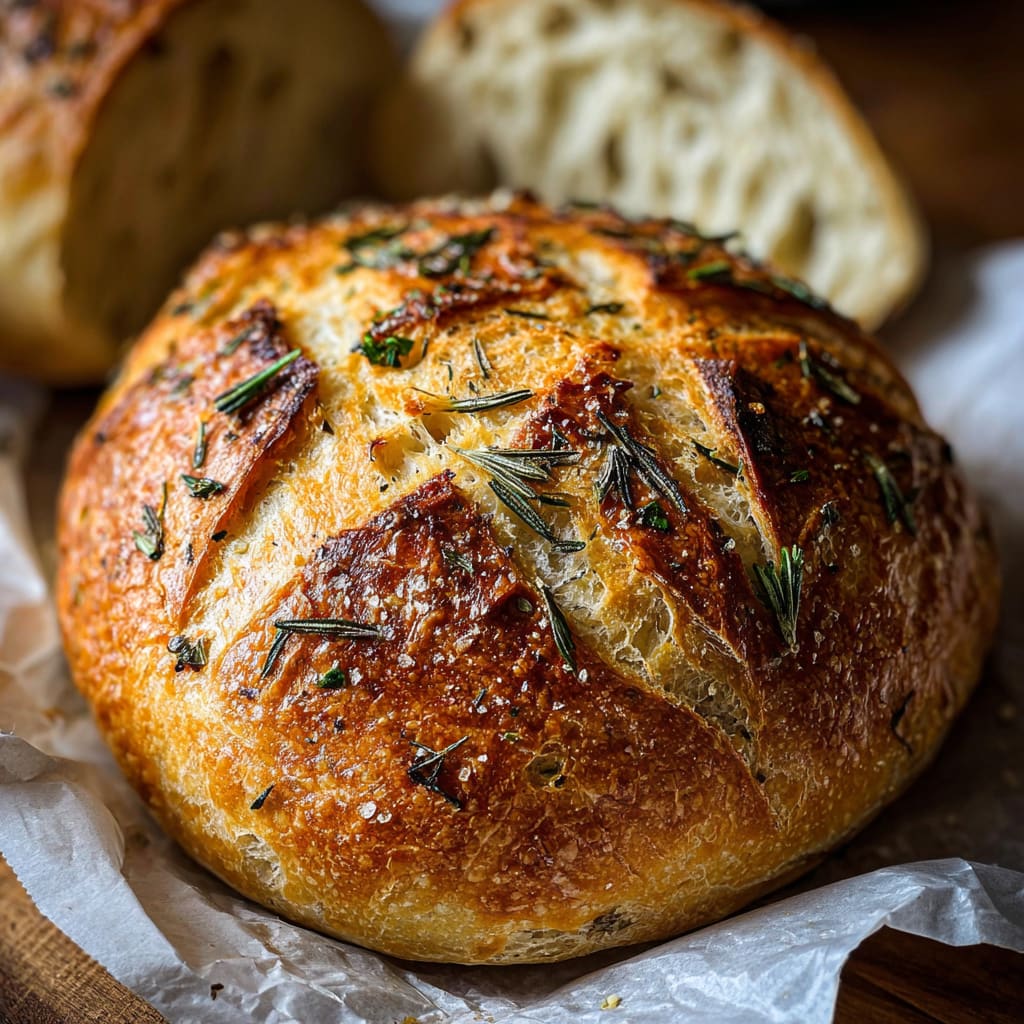
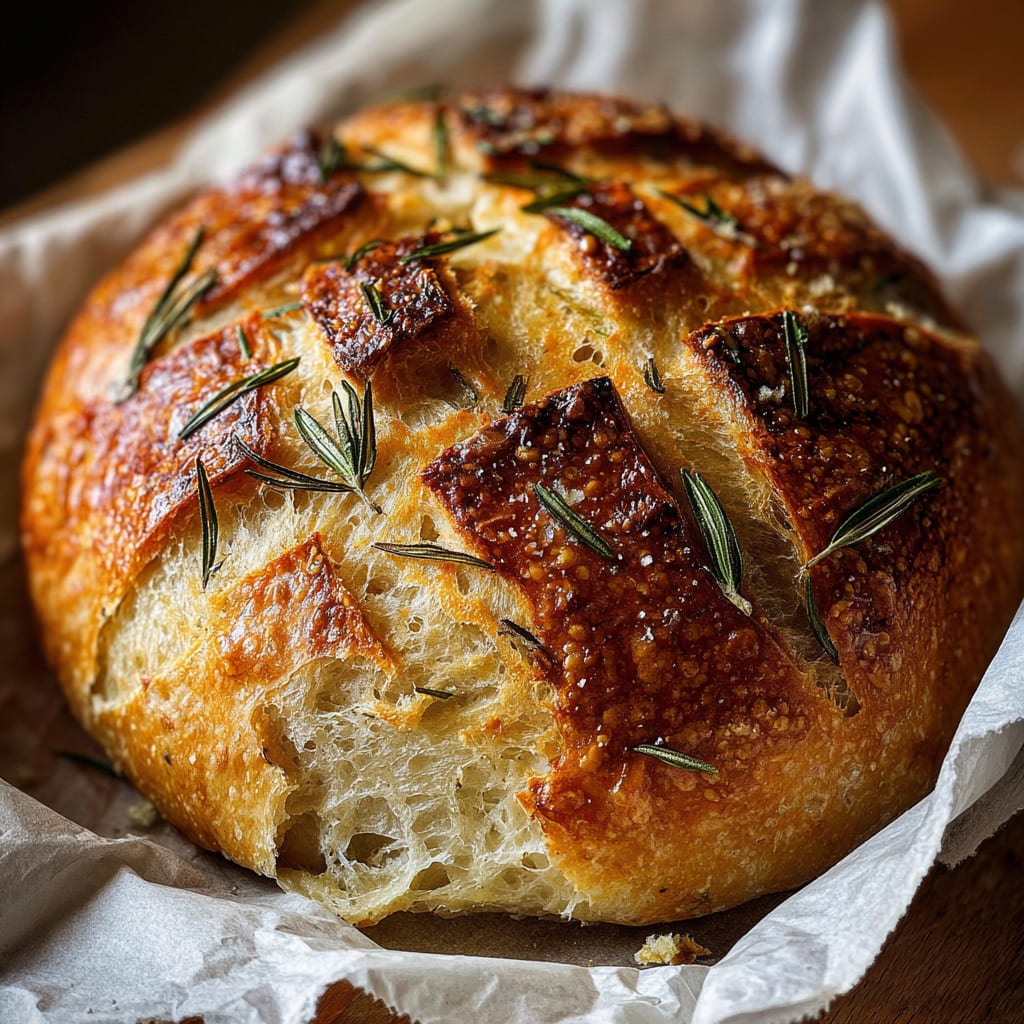
Imagine the intoxicating aroma of Easy Roasted Garlic Rosemary Artisan Bread filling your kitchen as it bakes to golden perfection. This rustic homemade bread combines the earthy fragrance of fresh rosemary with sweet roasted garlic, creating a loaf that’s crusty on the outside yet pillowy soft inside. Whether you’re a novice baker or experienced bread maker, this Easy Roasted Garlic Rosemary Artisan Bread recipe delivers professional bakery results with minimal effort. You’ll learn how to create a show-stopping artisan loaf with no kneading required, using simple ingredients and techniques that guarantee success every time.
Why You’ll Love This Recipe
This Easy Roasted Garlic Rosemary Artisan Bread will quickly become a staple in your baking repertoire. The heavenly combination of roasted garlic and fresh rosemary creates a flavor profile that’s both sophisticated and comforting. Unlike many artisan bread recipes that require complicated techniques or special equipment, this version simplifies the process without sacrificing quality.
The contrast between the crackling, rustic crust and the tender, airy crumb delivers that authentic artisan bread experience you’d expect from a high-end bakery. Each slice reveals beautiful air pockets and the aromatic herbs and garlic distributed throughout the loaf.
Perhaps best of all, this garlic herb bread recipe follows a “set it and forget it” approach – just mix, rest, and bake. The minimal hands-on time makes this bread perfect for busy weeknights when you want something special without the fuss. Even if you’ve never baked bread before, you’ll be amazed at how easily you can create a professional-looking and tasting loaf.
Ingredients
For this Easy Roasted Garlic Rosemary Artisan Bread, gather:
- 3 cups (375g) all-purpose flour, plus extra for dusting
- 1½ teaspoons salt
- ½ teaspoon instant yeast
- 1 head of garlic, roasted (about 10-12 cloves)
- 2 tablespoons fresh rosemary, chopped (or 1 tablespoon dried)
- 1½ cups (350ml) warm water (about 110°F/43°C)
- 2 tablespoons extra virgin olive oil
- 1 teaspoon honey or granulated sugar
- ¼ teaspoon freshly ground black pepper (optional)
- Cornmeal for dusting (optional)
For roasting the garlic:
- 1 head of garlic
- 1 tablespoon olive oil
- Pinch of salt
Pro Tips
Achieving bakery-quality Easy Roasted Garlic Rosemary Artisan Bread at home hinges on a few key techniques. First, don’t rush the fermentation process – the long, slow rise is what develops complex flavors and that perfect texture. While the recipe calls for at least 8-12 hours, you can extend this to 18 hours for even more flavor development. The dough will be sticky and wetter than traditional bread dough – this is exactly what you want! Resist the urge to add more flour as this moisture creates those beautiful air pockets.
For that signature crackling crust, steam is essential. Place a metal baking pan on the bottom rack of your oven while preheating, then pour a cup of hot water into it just before adding your bread. This creates the steam environment professional bakeries achieve with specialized ovens. Alternatively, bake your loaf in a preheated Dutch oven with the lid on for the first 25-30 minutes, then remove the lid to allow the crust to brown.
Finally, perfect your garlic roasting technique. When roasting garlic for this bread, look for the cloves to become golden brown and completely soft – they should easily squeeze out of their papery skins and mash effortlessly with a fork. This ensures the garlic flavor distributes evenly throughout your dough without overwhelming chunks.
Instructions
Step 1: Roast the Garlic
Preheat your oven to 400°F (200°C). Slice off the top quarter of a whole garlic head to expose the cloves. Place the garlic on a small piece of aluminum foil, drizzle with olive oil, and sprinkle with salt. Wrap the foil around the garlic, creating a sealed packet. Bake for 35-40 minutes until the cloves are golden and completely soft. Allow to cool, then squeeze the roasted garlic cloves from their skins and mash with a fork into a paste.
Step 2: Prepare the Dough
In a large mixing bowl, combine the flour, salt, yeast, chopped rosemary, and black pepper (if using). Mix well with a wooden spoon. In a separate small bowl, combine the warm water, olive oil, honey or sugar, and mashed roasted garlic paste. Pour the wet ingredients into the dry ingredients and stir until a shaggy dough forms. The dough will look rough and sticky – this is exactly right! No kneading is required.
Step 3: First Rise
Cover the bowl with plastic wrap or a damp kitchen towel and let it sit at room temperature for 8-12 hours. This long, slow fermentation develops flavor and texture. The dough should double in size and become dotted with air bubbles on the surface.
Step 4: Shape the Loaf
When ready to bake, generously flour a work surface. Use a rubber spatula to gently scrape the dough onto the floured surface – it will be very sticky. With floured hands, gently fold the dough over itself 4-5 times to create tension on the surface, then shape it into a round loaf. Be careful not to deflate too many air bubbles.
Step 5: Second Rise
Place a piece of parchment paper inside a medium bowl and dust with flour or cornmeal. Transfer your shaped dough to this parchment-lined bowl, seam side down. Cover with a kitchen towel and let rise for another 1-2 hours until puffy.
Step 6: Bake
About 30 minutes before baking, place a Dutch oven with lid (or a heavy baking pot that’s oven-safe) in the oven and preheat to 450°F (230°C). When ready to bake, carefully remove the hot pot from the oven. Lift the dough using the parchment paper and lower it into the hot pot. Score the top with a sharp knife if desired. Cover with the lid and bake for 30 minutes. Remove the lid and bake for another 10-15 minutes until the crust is deep golden brown. Transfer to a wire rack and let cool completely before slicing.
Variations
Transform this Easy Roasted Garlic Rosemary Artisan Bread with these popular variations to suit any meal or dietary need.
For a Mediterranean twist, add ½ cup of pitted, chopped Kalamata olives and ¼ cup of crumbled feta cheese to the dough. The salty brininess of the olives complements the roasted garlic perfectly, while the feta adds tangy pockets of flavor throughout the loaf. This variation pairs beautifully with Greek meals or as part of a mezze platter.
For those following gluten-free diets, substitute the all-purpose flour with a high-quality gluten-free bread flour blend (look for one containing xanthan gum). Add 1 tablespoon of psyllium husk powder to improve the texture and elasticity of the dough. Note that gluten-free bread won’t rise quite as dramatically, but will still deliver wonderful flavor and a rustic appearance.
For a heartier option, replace ½ cup of all-purpose flour with whole wheat flour and add 2 tablespoons of sunflower or pumpkin seeds to the dough. This creates a more nutritionally dense loaf with added texture and a subtle nutty flavor that complements the rosemary and garlic perfectly.
Storage and Serving
Your freshly baked Easy Roasted Garlic Rosemary Artisan Bread will maintain its best quality when stored properly. For short-term storage of 2-3 days, keep the bread at room temperature in a paper bag or wrapped in a clean kitchen towel. This preserves the crispy crust better than plastic bags, which trap moisture and soften the crust prematurely. For longer storage, slice the cooled bread and freeze it in a ziplock bag for up to 3 months, removing slices as needed and toasting them directly from frozen.
This bread shines as the centerpiece of a charcuterie board, accompanied by aged cheeses, cured meats, and honey. The robust flavors stand up beautifully to these rich pairings. For a simple yet elegant dinner, serve thick slices alongside homemade soup or stew, using it to soak up every last drop of broth.
For a memorable breakfast or brunch option, lightly toast slices and top with ricotta, a drizzle of honey, and fresh figs when in season. The sweet and creamy toppings balance perfectly with the savory garlic and rosemary infused throughout the bread.
FAQs
Can I use active dry yeast instead of instant yeast?
Yes, you can substitute active dry yeast for instant yeast in this Easy Roasted Garlic Rosemary Artisan Bread. Simply activate the active dry yeast in the warm water with the honey or sugar for 5-10 minutes until foamy before adding to the dry ingredients.
Why is my dough so sticky? Did I do something wrong?
Not at all! The dough for this bread is intentionally wet and sticky. This high hydration is what creates those beautiful air pockets and chewy texture in the finished loaf. Resist the urge to add more flour – instead, use well-floured hands when handling the dough.
Can I make this bread without a Dutch oven?
While a Dutch oven creates the ideal environment for baking this bread, you can use a regular baking sheet. Place a metal pan on the bottom rack of your oven, and when you put the bread in, pour 1 cup of hot water into the pan to create steam. This helps develop a good crust.
How do I know when my bread is fully baked?
The bread should have a deep golden-brown crust and sound hollow when tapped on the bottom. For absolute certainty, the internal temperature should reach 200-210°F (93-99°C) when tested with an instant-read thermometer.
Can I prepare the dough ahead of time and bake it later?
Yes! After the initial 8-12 hour rise, you can refrigerate the dough for up to 3 days. This actually enhances the flavor. When ready to bake, remove from the refrigerator, shape the cold dough, and allow an extra hour for the second rise.

Easy Roasted Garlic Rosemary Artisan Bread
- Prep Time: 15 mins
- Cook Time: 30 mins
- Total Time: 45 mins
- Yield: 4 servings 1x
- Category: Appetizer
- Method: Cooking
- Cuisine: Americaine
Description
Easy Roasted Garlic Rosemary Artisan Bread bursting with flavor from fragrant garlic, aromatic rosemary, perfect for sharing and impressing!
Ingredients
- 3 cups (375g) all-purpose flour, plus extra for dusting
- 1½ teaspoons salt
- ½ teaspoon instant yeast
- 1 head of garlic, roasted (about 10–12 cloves)
- 2 tablespoons fresh rosemary, chopped (or 1 tablespoon dried)
- 1½ cups (350ml) warm water (about 110°F/43°C)
- 2 tablespoons extra virgin olive oil
- 1 teaspoon honey or granulated sugar
- ¼ teaspoon freshly ground black pepper (optional)
- Cornmeal for dusting (optional)
- 1 head of garlic
- 1 tablespoon olive oil
- Pinch of salt
Instructions
- Step 1: Roast the Garlic Preheat your oven to 400°F (200°C). Slice off the top quarter of a whole garlic head to expose the cloves. Place the garlic on a small piece of aluminum foil, drizzle with olive oil, and sprinkle with salt. Wrap the foil around the garlic, creating a sealed packet. Bake for 35-40 minutes until the cloves are golden and completely soft. Allow to cool, then squeeze the roasted garlic cloves from their skins and mash with a fork into a paste.
- Step 2: Prepare the Dough In a large mixing bowl, combine the flour, salt, yeast, chopped rosemary, and black pepper. Mix well with a wooden spoon. In a separate small bowl, combine the warm water, olive oil, honey or sugar, and mashed roasted garlic paste. Pour the wet ingredients into the dry ingredients and stir until a shaggy dough forms. The dough will look rough and sticky. No kneading is required.
- Step 3: First Rise Cover the bowl with plastic wrap or a damp kitchen towel and let it sit at room temperature for 8-12 hours. This long, slow fermentation develops flavor and texture. The dough should double in size and become dotted with air bubbles on the surface.
- Step 4: Shape the Loaf When ready to bake, generously flour a work surface. Use a rubber spatula to gently scrape the dough onto the floured surface. With floured hands, gently fold the dough over itself 4-5 times to create tension on the surface, then shape it into a round loaf. Be careful not to deflate too many air bubbles.
- Step 5: Second Rise Place a piece of parchment paper inside a medium bowl and dust with flour or cornmeal. Transfer your shaped dough to this parchment-lined bowl, seam side down. Cover with a kitchen towel and let rise for another 1-2 hours until puffy.
- Step 6: Bake About 30 minutes before baking, place a Dutch oven with lid in the oven and preheat to 450°F (230°C). When ready to bake, carefully remove the hot pot from the oven. Lift the dough using the parchment paper and lower it into the hot pot. Score the top with a sharp knife if desired. Cover with the lid and bake for 30 minutes. Remove the lid and bake for another 10-15 minutes until the crust is deep golden brown. Transfer to a wire rack and let cool completely before slicing.
Notes
Fresh ingredients will always yield the best flavor results.
Nutrition
- Serving Size: 1 serving
- Calories: 300
- Sugar: 5g
- Sodium: 400mg
- Fat: 10g
- Saturated Fat: 3g
- Unsaturated Fat: 7g
- Trans Fat: 0g
- Carbohydrates: 40g
- Fiber: 5g
- Protein: 15g
- Cholesterol: 50mg