Description
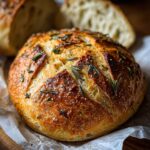
Easy Roasted Garlic Rosemary Artisan Bread bursting with flavor from fragrant garlic, aromatic rosemary, perfect for sharing and impressing!
Ingredients
Scale
- 3 cups (375g) all-purpose flour, plus extra for dusting
- 1½ teaspoons salt
- ½ teaspoon instant yeast
- 1 head of garlic, roasted (about 10–12 cloves)
- 2 tablespoons fresh rosemary, chopped (or 1 tablespoon dried)
- 1½ cups (350ml) warm water (about 110°F/43°C)
- 2 tablespoons extra virgin olive oil
- 1 teaspoon honey or granulated sugar
- ¼ teaspoon freshly ground black pepper (optional)
- Cornmeal for dusting (optional)
- 1 head of garlic
- 1 tablespoon olive oil
- Pinch of salt
Instructions
- Step 1: Roast the Garlic Preheat your oven to 400°F (200°C). Slice off the top quarter of a whole garlic head to expose the cloves. Place the garlic on a small piece of aluminum foil, drizzle with olive oil, and sprinkle with salt. Wrap the foil around the garlic, creating a sealed packet. Bake for 35-40 minutes until the cloves are golden and completely soft. Allow to cool, then squeeze the roasted garlic cloves from their skins and mash with a fork into a paste.
- Step 2: Prepare the Dough In a large mixing bowl, combine the flour, salt, yeast, chopped rosemary, and black pepper. Mix well with a wooden spoon. In a separate small bowl, combine the warm water, olive oil, honey or sugar, and mashed roasted garlic paste. Pour the wet ingredients into the dry ingredients and stir until a shaggy dough forms. The dough will look rough and sticky. No kneading is required.
- Step 3: First Rise Cover the bowl with plastic wrap or a damp kitchen towel and let it sit at room temperature for 8-12 hours. This long, slow fermentation develops flavor and texture. The dough should double in size and become dotted with air bubbles on the surface.
- Step 4: Shape the Loaf When ready to bake, generously flour a work surface. Use a rubber spatula to gently scrape the dough onto the floured surface. With floured hands, gently fold the dough over itself 4-5 times to create tension on the surface, then shape it into a round loaf. Be careful not to deflate too many air bubbles.
- Step 5: Second Rise Place a piece of parchment paper inside a medium bowl and dust with flour or cornmeal. Transfer your shaped dough to this parchment-lined bowl, seam side down. Cover with a kitchen towel and let rise for another 1-2 hours until puffy.
- Step 6: Bake About 30 minutes before baking, place a Dutch oven with lid in the oven and preheat to 450°F (230°C). When ready to bake, carefully remove the hot pot from the oven. Lift the dough using the parchment paper and lower it into the hot pot. Score the top with a sharp knife if desired. Cover with the lid and bake for 30 minutes. Remove the lid and bake for another 10-15 minutes until the crust is deep golden brown. Transfer to a wire rack and let cool completely before slicing.
Notes
Fresh ingredients will always yield the best flavor results.
Nutrition
- Serving Size: 1 serving
- Calories: 300
- Sugar: 5g
- Sodium: 400mg
- Fat: 10g
- Saturated Fat: 3g
- Unsaturated Fat: 7g
- Trans Fat: 0g
- Carbohydrates: 40g
- Fiber: 5g
- Protein: 15g
- Cholesterol: 50mg