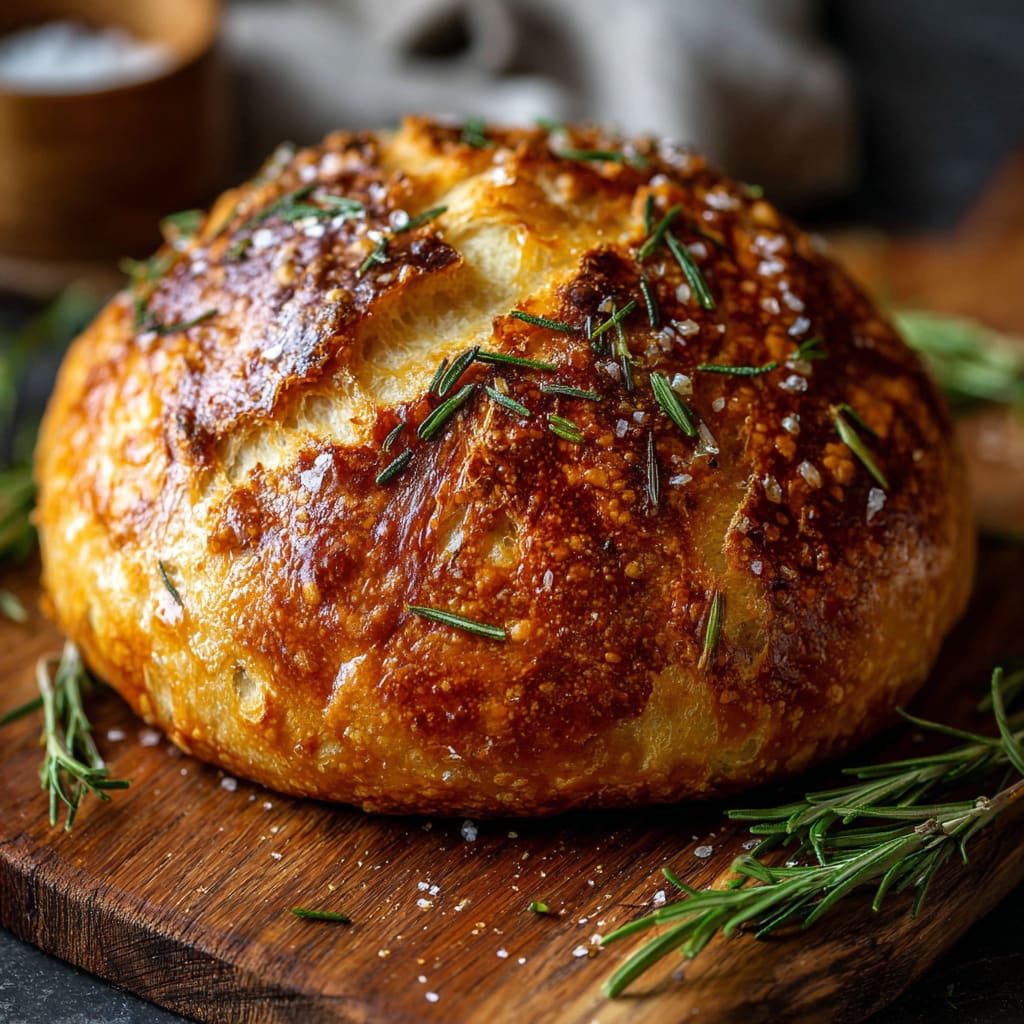
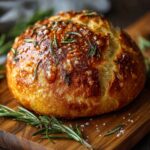
Imagine pulling a golden, crackling loaf from the oven, filling your kitchen with the warm scent of roasted garlic and fragrant rosemary. This Rustic No Knead Rosemary Garlic Bread is as effortless as it is impressive, requiring nothing more than a bowl, a spoon, and a little patience. No special equipment, no complicated techniques, just a beautifully crusty artisan-style loaf that tastes like it came from a bakery. Whether you are an experienced home baker or a complete beginner, this recipe meets you exactly where you are. You’ll learn the best tips, step-by-step instructions, easy variations, and smart storage ideas to make this bread perfectly every time.
Why You’ll Love This Recipe
This Rustic No Knead Rosemary Garlic Bread checks every box for a truly satisfying bake. First, there is zero kneading involved, which means minimal effort and virtually no mess. The long, slow rise does all the work for you, developing complex flavors and an incredibly chewy, open crumb that rivals any artisan bakery loaf. The combination of bold roasted garlic and earthy fresh rosemary creates a savory depth that is simply irresistible. The crust bakes up shatteringly crisp on the outside while the interior stays tender and moist. It pairs beautifully with soups, pastas, charcuterie boards, or simply a generous slather of butter. The recipe uses pantry staples you likely already have on hand, making it both budget-friendly and accessible any day of the week. Once you try this easy no knead bread, it will become a permanent part of your baking rotation.
Ingredients List for the Rustic No Knead Rosemary Garlic Bread
Gather these simple, everyday ingredients before you begin. Each one plays an important role in building the flavor and structure of this incredible loaf.
• 3 cups all-purpose flour
• 3 cloves garlic, minced
• 1 tbsp finely chopped fresh rosemary (or more, to taste)
• 1 ¼ tsp kosher salt
• ¾ tsp freshly ground black pepper
• ½ tsp instant yeast
• 1 ½ cups water, at room temperature
• 2 tbsp cornmeal
Pro Tips
Use room temperature water. Water that is too hot will kill the yeast, while water that is too cold will slow fermentation dramatically. Aim for water between 68°F and 75°F for the best, most consistent rise with your no knead rosemary garlic bread.
Do not rush the first rise. The 18 to 24 hour fermentation window is where all the magic happens. This extended rest allows the gluten to develop naturally without any kneading and gives the bread its signature complex, slightly tangy flavor. Resist the urge to shorten this step.
Preheat your skillet. For an extra crispy bottom crust, place your cast iron skillet in the oven while it preheats to 450°F before adding the dough. A hot skillet creates immediate contact heat that produces a bakery-quality crust from the very first minute of baking. This single step dramatically elevates your final result.
Instructions
Step 1: Mix the Dry Ingredients
In a large bowl, combine flour, garlic, rosemary, salt, pepper, and yeast.
Step 2: Add Water and Form Dough
Add water using a wooden spoon or your hand, mixing until a wet, sticky dough forms, about 30 seconds.
Step 3: First Rise
Cover the bowl tightly with plastic wrap and let stand at room temperature until the surface is dotted with bubbles, about 18–24 hours.
Step 4: Prepare the Skillet
Lightly oil a 10-inch cast iron skillet or coat with nonstick spray. Sprinkle with cornmeal.
Step 5: Shape the Dough
On a lightly floured surface, gently shape the dough into a round. Place the dough into the prepared skillet. Cover with a clean dishtowel and let stand at room temperature until doubled in size and it does not spring back when poked, about 2 hours.
Step 6: Bake the Bread
Preheat oven to 450°F. Bake the dough until golden brown, about 30–40 minutes.
Variations
This versatile no knead rosemary garlic bread lends itself beautifully to creative customization.
Cheesy Herb Version: Fold ½ cup of shredded Parmesan or sharp cheddar directly into the dough before the first rise. The cheese melts into the crumb during baking, adding a rich, savory layer that pairs wonderfully with the garlic and rosemary.
Olive and Sun-Dried Tomato: Add ¼ cup of roughly chopped kalamata olives and 3 tablespoons of chopped sun-dried tomatoes to the dough mixture. This Mediterranean-inspired variation transforms the loaf into a bold, flavor-packed centerpiece that is stunning on any dinner table.
Whole Wheat Blend: Substitute one cup of the all-purpose flour with whole wheat flour for a nuttier, earthier flavor profile and added nutritional value. The texture will be slightly denser but equally delicious and hearty, making it a fantastic everyday sandwich or toast bread.
Storage and Serving
Storing Your Bread: Once fully cooled, store your Rustic No Knead Rosemary Garlic Bread at room temperature wrapped in a clean kitchen towel or placed in a paper bag for up to 2 days. For longer storage, wrap the loaf tightly in plastic wrap followed by a layer of aluminum foil and freeze for up to 3 months. Thaw at room temperature before serving. Avoid storing in a plastic bag at room temperature, as this softens the crust.
Serving Suggestions: This bread is spectacular served warm alongside a bowl of tomato soup, ribollita, or creamy pasta. Slice it thick and serve with extra virgin olive oil and balsamic vinegar for dipping. It also makes an outstanding base for bruschetta, crostini, or a rustic open-faced sandwich topped with fresh ricotta and roasted vegetables.
FAQs
Can I make this bread without a cast iron skillet?
Yes. A regular oven-safe baking dish or a Dutch oven works well as a substitute. A Dutch oven with a lid is especially effective for trapping steam and producing an even crispier crust.
Can I use active dry yeast instead of instant yeast?
You can, but active dry yeast should be dissolved in the water for about 5 minutes before adding it to the dry ingredients. The rise time may be slightly longer than with instant yeast.
What if my dough is too sticky to shape?
This dough is naturally very wet and sticky. Use generously floured hands and a well-floured surface when shaping. Avoid adding too much extra flour, as this will tighten the dough and affect the final texture of your rustic no knead bread.
Why does the recipe call for cornmeal in the skillet?
Cornmeal prevents the dough from sticking to the skillet and adds a pleasant, slightly crunchy texture to the bottom crust of the finished loaf.
Can I add more garlic or rosemary?
Absolutely. The recipe already notes that rosemary can be added to taste. Feel free to increase the garlic to 4 or 5 cloves or add an extra teaspoon of rosemary if you prefer a bolder, more aromatic flavor profile in your Rustic No Knead Rosemary Garlic Bread.
Rustic No Knead Rosemary Garlic Bread
- Prep Time: 15 mins
- Cook Time: 30 mins
- Total Time: 45 mins
- Yield: 4 people 1x
- Category: Dinner
- Method: Cooking
- Cuisine: American
Description
Bake a delicious Rustic No Knead Rosemary Garlic Bread today. Discover easy recipe tips now!
Ingredients
- 3 cups all-purpose flour
- 3 cloves garlic, minced
- 1 tbsp finely chopped fresh rosemary (or more, to taste)
- 1 ¼ tsp kosher salt
- ¾ tsp freshly ground black pepper
- ½ tsp instant yeast
- 1 ½ cups water, at room temperature
- 2 tbsp cornmeal
Instructions
- Step 1– Mix the Dry Ingredients
In a large bowl, combine flour, garlic, rosemary, salt, pepper, and yeast. - Step 2– Add Water and Form Dough
Add water using a wooden spoon or your hand, mixing until a wet, sticky dough forms, about 30 seconds. - Step 3– First Rise
Cover the bowl tightly with plastic wrap and let stand at room temperature until the surface is dotted with bubbles, about 18–24 hours. - Step 4- Prepare the Skillet
Lightly oil a 10-inch cast iron skillet or coat with nonstick spray. Sprinkle with cornmeal. - Step 5- Shape the Dough
On a lightly floured surface, gently shape the dough into a round. Place the dough into the prepared skillet. Cover with a clean dishtowel and let stand at room temperature until doubled in size and it does not spring back when poked, about 2 hours. - Step 6– Bake the Bread
Preheat oven to 450°F. Bake the dough until golden brown, about 30–40 minutes.
Notes
Try This Recipe and Leave a comment Below, your opinion matters to me!
Nutrition
- Serving Size: 4 serving
- Calories: 400
- Sugar: 5g
- Sodium: 400mg
- Fat: 10g
- Saturated Fat: 3g
- Unsaturated Fat: 7g
- Trans Fat: 0g
- Carbohydrates: 40g
- Fiber: 5g
- Protein: 15g
- Cholesterol: 50mg